Posts

Showing posts from November, 2022

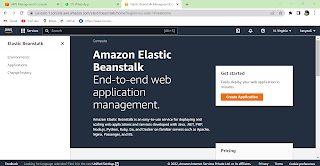
Exercise the Elastic Bean stalk used for hosting web applications.
Image
  Step 1: Create account in AWS management console , and select the region.  Step 2: Create an application and an Environment:  -> Open the elastic Beanstalk console. -> Provide an application name and add tag and value (optional). -> Creates an Elastic Beanstalk application named newapp. Launches an environment named newapp-env with AWS resources. During the environment creation process, the console tracks progress and displays events. -> When all of the resources are launched and the EC2 instances running the application pass health checks, the environments health changes to Ok. Note: Now you can use your web application's website. Step 3: Explore Environment. -> In navigation pane, choose Environments, and then choose the name of your environment from the list. --> The environment's url is located at the top of the overview, below the environment name. Choose the url to get to the example applications congratulations page.         ...

Exercise 8 : Create and Carrout Read and Write Operation in AWS Dyanmo DB

Image
To create and carrout read and write operation in AWS Dynamo DB: 1. In navigation, click dynamoDB option. And click create table option. 2. In table details field, fill the required name, partition key and sort key and fill the required fields and  click create button. 3.  In navigation ,click explore items option. Select the table that you have created.       Click create item option and fill the details of partition keys and click create. 4. Repeat the step 3 again create partition key  and enter value and click create item. 5.  After creating 3 attributes(partitions) and again click create item option . In add attribute option, select binary and again click attribute and select list and  click create item button. 6. Yeah, we have done write operation. To read that, click the scan/query items. Click scan, In filters, select the attribute that you have created and enter the value. And select the run button. And you will get  successful messa...

Exercise 7(b) : Set up a RDS MySQL server in AWS

Image
 To setup a RDS server in AWS: 1. In navigation, select Amazon RDS option . And select create database option. 2.  Select the standard create option in Choose a database creation method . And in Engine options, select MySQL option. 3. In templates, select Free tier option and fill the unique name in DB instances identifier. 4.  In master username, type the login ID as admin. And in master password enter the password and confirm it again by entering it in confirm master password again. 5. In storage area, select the required storage type and allocate storage as 20 GIB and leave others as default. 6 . In public access, select yes instead of No and note the database port, whether it is   3306. 7. In database authentication, select password authentication option. Click  Create button. Copy the endpoint port address. 8. After successful installation of MySQL workbench, select the connection option in the bottom left corner, a window appears and...

EXERCISE 7(a) : INSTALLING MYSQL IN AWS

Image
To install mySql in AWS:  1. Assume that you have created an EC2 instance. 2. Select  the ec2 instance you have created and click the connect button. 3. Execute the following command to go to the root. 4. Execute the following command to install mysql server. 5. Execute the following command for secure installation. 6. Hit enter for root password.     Enter the password. And click y. 7. Enter y to reload privileges tables to shown below.      Execute the following command to login to the database and enter the password. 8.  Execute the following command to see the databases available. 9. To create database, execute the following command. 10. To create user, execute the following command. And use this command to grant all privileges. To save all the changes, use the following command. And use the quit command to come out of database.

EXERCISE 6 : Hosting a static website on Amazon S3

Image
 Hosting a static website on Amazon S3: Step 1:To create a bucket Sign in to the AWS Management Console and open the Amazon S3 console at  https://console.aws.amazon.com/s3/ .   2.  Choose  Create bucket .                                     3.  Enter the  Bucket name.      4.  Choose the Region where you want to create the bucket.   5.  To accept the default settings and create the bucket, choose  Create .    Step 2: Enable static website hosting In the  Buckets  list, choose the name of the bucket that you want to enable static website hosting for.     2.  Choose  Properties .    3. Under   Static website hosting , choose   Edit .    4. Choose   Use this bucket to host a website . 5. Under   Static website hosting , choose   Enable . 6. In...

virtual to virtual migration

Image
First download virtual box in your window: Click File -> Export Appliances In that window, click the browse that the file .ova and click next button. And later, select the ubuntu that you have already created.   And click export option. And the window appears like this. In, Vmware workstation, window appears like this. Click open virtual. A window opens, and fill the required that requires.

Application-Load balancer

Image
Creation of application load balancer for VPC the pre-requisites that are required for this application load balancer are An AWS account https://aws.amazon.com/console/ Now let us look into the steps required for creating a application load balancer: First in order to create a load balancer we need a VPC with different subnets associated with different regions so go ahead and first create a VPC first with following configurations. 2. Now I am going to create four subnets where I use each of two subnets as private and public respectively with different regions for each of them in private and public respectively go to subnets section in your AWS console and click on create subnet enter the configurations as given in the below                                                  Similarly create two other subnets with different regions and Ip addresses. 3. Now we have to...